BlendFeel - Turkish Tobacco
Turkish tobacco is amazingly easy to grow. The hardest part, which is still easy, is starting the seeds and transplanting to the outdoor garden location. Once transplanted, Turkish tobacco "grows like a weed" and will only need watering if you have not much rain, fertilizing if your soil is poor, and daily inspection to prevent tobacco hornworm from eating your crop. None of this is as difficult as it sounds, and if you are not against using pesticides, the daily inspection isn't needed. However, I do NOT recommend pesticides, after all you will be smoking this plant, no need to add chemical poison to YOU just to save some work removing bugs!(DUH).
Tobacco seeds need light to sprout. To start your seeds indoors you will need a plant starter tray with clear humidity cover, some potting soil (ProMix BX is excellent and should be available at your local garden store in a 3.8 cu foot bale for about $40 US, or you can order a smaller amount from us), and some sort of grow light with a timer for uniform daytime (while letting your new plants get big enough to go outside, or if growing exclusively indoors).
For light, standard 4' flourescent shoplites will work, but will produce somewhat spindly seedlings by the time they're ready to transplant. Once outdoors they will recover, so don't worry if all you have for lighting is shoplites, it will just delay development by a couple weeks as opposed to using HPS or MH growlites for seedstarting. If using shoplites, get (2) 4 foot fixtures which have 2 tubes in each, total 4 tubes, and no need for fancy "grolux" bulbs, plain cool white or "kitchen & bath" tubes will work fine and cost less. Hang both shoplites about 2 to 3 inches above your seedstarting tray and plug them into a standard appliance timer set for 18 hours of "ON" time, it doesn't matter if they're on during actual night or day.
All original content copyright (C) 2009-2023 blendfeel.pro. All rights reserved.
Turkish tobacco seeds not for sale in the State of New Hampshire
or where prohibited by law. All other products, including the FREE seeds
available with the Grow Kit, will be distributed only to the
48 contiguous States (including New Hampshire) through PayPal processing.
Check your state/local laws before ordering. Buyer assumes all risks.
3 WAYS TO ORDER!
PayPal
Bitcoin
Cash

ATTENTION: SEEDS NOT FOR SALE IN THE STATE OF NEW HAMPSHIRE
HPS (High pressure sodium) or MH (Metal halide) grow lites will produce robust healthy seedlings; indeed, you could grow your entire crop indoors using these lamps, but the initial cost is significantly more than shoplites, and at 400 and 1000 watt ratings they use significantly more electricity than a couple shoplites. Still, with the increasing cost of tobacco, it's currently economically feasible to grow your entire years supply of tobacco indoors, and in the future may even be cheaper than buying storebought tobacco. If you desire a professional MH or HPS growlite, we do have good quality digital ballast, bulb and reflector systems available for between $200-$300 US depending on wattage, please email your interest. Setup would be similar to using shoplites except the bulb must be hung about 12-18 inches above the seed starting tray, or kept that far above the top of the plants if you are growing entirely indoors. Note: you only should need 1 lamp and ballast set, unless growing a large room full of fullsize plants.
With your lighting needs all set, about 2 months before the last spring frost in your area, simply fill the cells of your seed starting tray with promix, moisten well, sprinkle 3 to 5 seeds on top of the soil in each cell and DO NOT COVER WITH ANY SOIL, spray with a mister bottle to water in, then put the humidity cover on and set the tray(s) under your light. Within a week if using a heat mat, up to three weeks without, you will see tiny, tiny sprouts. Remove or unplug the heatmat as soon as most of the cells have sprouts. In about 2 weeks more they will have 2 leaves about the size of a quarter. This is the time to give some dilute fertilizer, I use pigmanure tea, miracle gro is fine and probably more available(and pleasant) when mixed half a tablespoon to 1 gallon rainwater, or plain water left to sit until city chlorine dissipates from it(about a day). Water into the tray under the plant cells so the liquid soaks up from underneath, within a week remove the weakest plants from each cell, leaving the 1 best per cell, and water with the fertilizer mix as needed until transplant time, which should still be about a month away. The roots being cramped in a 72 cell plant tray will keep the plants from getting BIG even with fertilizer, but by transplant time should have 4 to 6 leaves each about 4 to 6 inches long and cramping each other in the tray.
If yours aren't doing as well, still don't worry, transplanting will let the roots spread out and in a week or two you'll be shocked at how big and how fast these plants grow.
To transplant, your planting area should be well tilled, fertile soil either naturally fertile, like that spot in past years that always grows naturally lush weeds and grass, or enriched with manure. If you usually have a garden you'll know what to do. If not, here are some options: 1) Prepare a whole garden spot; with a rototiller till up your chosen area to about 8 inches deep, then spread a bag of composted manure over each 4 by 6 foot area and till in again, OR 2) Dig a hole for each plant you plan to plant about 1 foot deep by 1 foot round and mix a shovel full of manure into the loosened soil, spacing plants about 2 feet from any other plant in row and from other rows. If you don't want to use manure, just dig the holes so the soil is loose, then after transplanting use miracle gro to water in, then a week later put a handfull of 10-10-10 chemical fertilizer sprinkled around the base of each plant, BUT NOT TOUCHING THE PLANT!
Transplanting into pots is pretty much the same, and allows people who don't have a yard to grow their own too! Use a separate pot for each plant. Five gallon pails with a drainage hole drilled in the bottom is a good size, if you use only a one or three gallon container the plants won't get as big, but will still get big enough to tip over the pots from the plants weight, so use five gallon, drill a halfinch hole or two in the bottom, fill fully with potting mix or good garden soil, and place in a sunny spot on a patio. Voila!
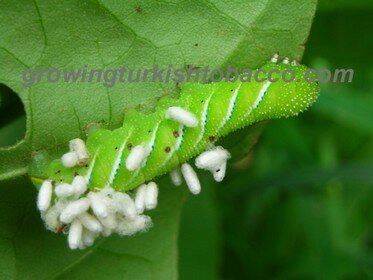
After a week or two of apparently no growth, your plants will start to grow seemingly overnight! With normal rain you may not have to water, but extra watering won't hurt, tobacco is very thirsty, water at the base not with a sprinkler. If leaves begin yellowing, fertilize again as when transplanting by placing more around the base of each plant. Look at them daily to see if any holes are being eaten through the leaves; if so, look closely for green, possibly HUGE, caterpillars with a spike on the tail end (which isn't a stinger, by the way, it can't hurt you). Pluck them off and crush them under boot, UNLESS you find one with rows of white egg-looking things along it's back: let it live because the white eggs are parasitic wasps which will naturally kill all the other hornworms in your patch.
If you aren't afraid of chemicals, sevindust is supposed to be OK to use on tobacco if you wait to harvest after the last application, but I wouldn't want to smoke it! If you do opt for chemical pesticides, definitely READ AND FOLLOW ALL LABEL DIRECTIONS!!!
After about two months of growing outdoors the tops will elongate and begin to make flowers. For best tobacco yield and quality the tops should then be cut off, one pair of leaves lower than where the flowers begin. This forces the plant to put its energy into enlarging and developing it's existing quality leaves, rather than draining from them, and greatly improves your yield and quality of smoking leaves.
All throughout the growing season you can remove a leaf here and there to try out, and any lower leaves that drape on the ground should also be removed. Rinse the individually harvested leaves in your sink to remove any clinging dirt or bugs, then dry. A regular food dryer works well for a quick dry, or hang them in loose bunches in the sun on a clothesline to do a simple "suncure" which works very well for Turkish tobacco especially. Don't sample leaves if you used chemical pesticides! In that case, wait the proper withdrawal period plus a week or two. (Drying in a low oven will probably disappoint you.)
Your main harvest can be done as soon as two weeks after the flowertops have been cut off up to immediately before your first fall frost by simply cutting the plant at the base, and hanging the whole plant upside down in the sun on a clothesline until the leaves are dry, then clip the leaves off and stack them by size, unless you are having freezing temperatures. In that case the plants must be hung indoors or in a heated shed to prevent the moist leaves turning to mush from freezing, which would leave them smokable but NOT enjoyable.
There are many other "fine points" which can really only be learned by trial and error, but the above growing tips should enable you to produce your own supply of fine quality tobacco. Our RESOURCES page has links to much more involved info on curing and growing as well as a nostalgic flavor, and it's FREE!
If you email specific questions that aren't addressed here, we may add them to our FAQ to help all potential growers.
orders(at)growingturkishtobacco(dot)com (Replace the (at) with '@' and the (dot) with a period.)